

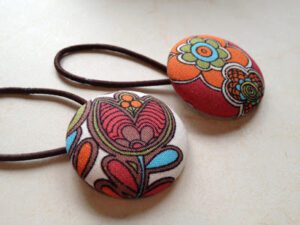
If you have a scrap fabric box, this is the tutorial for you. This is the perfect quick and easy scrap fabric tutorial, especially if you have a little girl in your life who likes hair accessories.
Supplies:
- Cover Button Kit with wire button loop (kits usually include a tool, button cover fronts and backs), I used 1.5″ button covers but you can use anywhere from .75″ up to 2″ depending on the size of your scrap fabric and personal preference*
- fabric scraps
- scissors
- hair elastic bands (try to get thinner ones, they are easier to pull threw the button shank)
- needle nose pliers, optional
* A good place to get cover button supplies is Cover Button City on Etsy, I have ordered supplies from them and they are quick to deliver and very helpful
- Cut a fabric twice the diameter of your button. Since my button size was 1.5″ my circle ended up being 3″ side.

- With the wrong side up, center the fabric in the button tool and place the top button shell over top of the fabric (convex side down).
- Tuck the fabric towards the center of the button.
- Place the backer shank side up over the button and use the tool to snap the back into place.
- Remove the button from the tool.
- Take the elastic hair band and push it through the shank of the button. *NOTE: I had to use needle nose pliers to get the hair band through the shank.
- Loop the one end of the elastic band through the other forming a knot to keep the band in place on the button.


1 thought on “Fabric Button Hair Bands”
Love the happy fun fabric you have used! Great tutorial.
Comments are closed.